R1100S Retro Fit Heated Grips
Moderators: slparry, Gromit, Paul
-
jeznewsome

- Posts: 350
- Joined: Sat Aug 04, 2012 7:30 am
- Location: Preston, Lancs
-
dave the german
- Member
- Posts: 3644
- Joined: Tue Nov 01, 2005 4:35 am
- Location: North East
-
jeznewsome
- Posts: 350
- Joined: Sat Aug 04, 2012 7:30 am
- Location: Preston, Lancs
All sorted and, as promised, a little write up in case any other paupers, who don't already have them, want to retro fit. Hopefully it will help someone else if they want to do the same.
R1100S BMW Heated Grip Retro-Fit (2000 ish model year…..not ALL models will be the same!)
Bits Required (Motorworks parts quoted for reference):
- Heated Grips (from a variety of oilheads): HAT1521 (left) HAT15222 (Right)
I got a pair from eBay, from a R1100RT, as Motorworks were out of stock. These came with a mechanical (friction) ‘throttle lock’ for cruise control……never likely to use that but they had decent condition rubbers and pictures showed original spade connectors were in place.
- RH Switch Cluster (from R1100S or R1200C). Single spark bikes with headlight switch are ELT06783 Note: though switchgear from other variants may look the same on the bars but have VERY different connector types……..don’t make the same mistake I did
- A Fused Wiring Loom: Wire harness fuse box Pt No 6112 2306877. This is required to go between the Pinky plug in RHS fuse box to the wires from the grips and the additional plug from the RH Switch Cluster for the heat control. Some looms may have a yellow plug on instead of a pinky one. I could find this on motorworks sight but an email/telecon got it sorted.
 DSC_0477 by jeznewsome, on Flickr
- A 4 way connector block to finish the connection to the Aux Loom from the grips. (ELA61706)
Remove Left and Right Fairing panels (3mm allen key to remove most bolts including the one behind the BMW logo on the inside of the fairing and a single Philips screw holding the panel to the central oil cooler intake piece). Disconnect indicator wiring to finally remove.
Then remove the petrol tank. Disconnecting (and plugging) the two fuel pump lines on the RHS (otherwise fuel will be all over the place!), the breather lines and the fump pump electrical connection.
Popping the lid off the RH fuse box inside I found this:
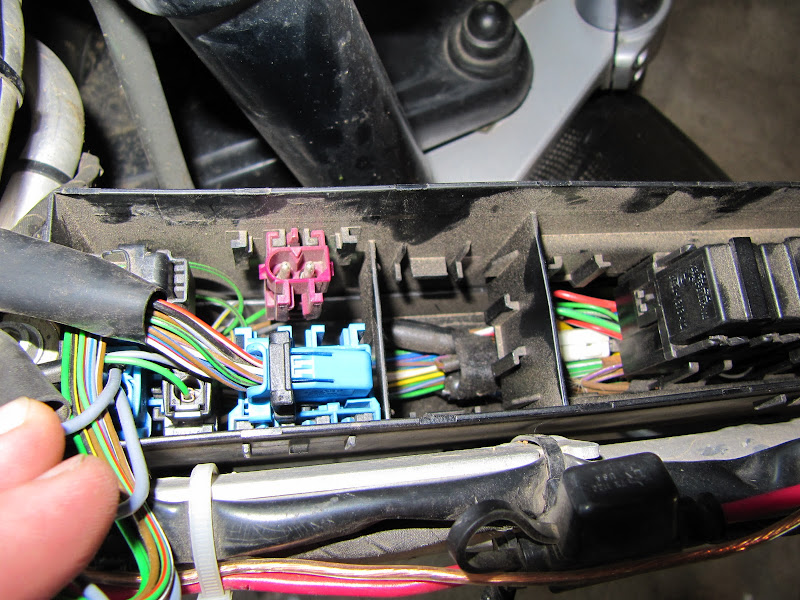
RHS switch gear plugs into multiway black and 2 way blue plug on LHS. The pinky open plug is where the extra fused loom plugs in.
So cutting to the chase:
• Fit the Fuse Box from the Aux Loom to the mount on the upper RHS of the fairing frame. Use the one on the LHS of the frame as a guide.
 DSC_0481 by jeznewsome, on Flickr
• Change over the RHS Switchgear. There are a number of screws and various plastic covers/guides to remove for this and also to remove the throttle tube/grip.
• Remove the grips. RHS will only come out once throttle cable and guide have been removed and turned to the right place for the keyway. LHS is held on by two cross head screws
• Fit the heated grips to both sides. As the ones I bought had already been cut and soldered I did this the easy way by cutting again and threading the non grip cut end into the hold on the end of each clip on before twisting the bare wire ends together and pulling back through.
 DSC_0476 by jeznewsome, on Flickr
• Connect up the Switchgear to the original Blue and Black plug AND the new 3 way black plug on the Aux Loom.
 DSC_0482 by jeznewsome, on Flickr
• Route and clip all wires/looms – following how the bike was before you started and how the looms fall, this is relatively straight forward but time consuming to make neat. Note I only used the orange cable ties in areas that wouldn't be seen with the bodywork on!
• The heated grip connector (white 4 way) I routed to under the tank area. The cut ends from the grips were then re-soldered and heat shrunk such that the join was against a frame rail, for support and appropriately cable tied up.
 DSC_0483 by jeznewsome, on Flickr
• Before putting the tank back on, function of the grips and other switched stuff to make sure it all works appropriately.
Reassemble all you took off and enjoy warm hands.
All in all it took longer than I had thought it would but I was learning as I went along and it would be MUCH quicker if I had to do it again!
I must thank Motorworks who's service and advice has been excellent in making good my original ordering error (wrong switchgear ordered) and sending out the final missing connector to finish the job FOC (and 1st Class) so I could get the job finished today

R1100S BMW Heated Grip Retro-Fit (2000 ish model year…..not ALL models will be the same!)
Bits Required (Motorworks parts quoted for reference):
- Heated Grips (from a variety of oilheads): HAT1521 (left) HAT15222 (Right)
I got a pair from eBay, from a R1100RT, as Motorworks were out of stock. These came with a mechanical (friction) ‘throttle lock’ for cruise control……never likely to use that but they had decent condition rubbers and pictures showed original spade connectors were in place.
- RH Switch Cluster (from R1100S or R1200C). Single spark bikes with headlight switch are ELT06783 Note: though switchgear from other variants may look the same on the bars but have VERY different connector types……..don’t make the same mistake I did
- A Fused Wiring Loom: Wire harness fuse box Pt No 6112 2306877. This is required to go between the Pinky plug in RHS fuse box to the wires from the grips and the additional plug from the RH Switch Cluster for the heat control. Some looms may have a yellow plug on instead of a pinky one. I could find this on motorworks sight but an email/telecon got it sorted.
DSC_0477 by jeznewsome, on Flickr- A 4 way connector block to finish the connection to the Aux Loom from the grips. (ELA61706)
Remove Left and Right Fairing panels (3mm allen key to remove most bolts including the one behind the BMW logo on the inside of the fairing and a single Philips screw holding the panel to the central oil cooler intake piece). Disconnect indicator wiring to finally remove.
Then remove the petrol tank. Disconnecting (and plugging) the two fuel pump lines on the RHS (otherwise fuel will be all over the place!), the breather lines and the fump pump electrical connection.
Popping the lid off the RH fuse box inside I found this:
RHS switch gear plugs into multiway black and 2 way blue plug on LHS. The pinky open plug is where the extra fused loom plugs in.
So cutting to the chase:
• Fit the Fuse Box from the Aux Loom to the mount on the upper RHS of the fairing frame. Use the one on the LHS of the frame as a guide.
DSC_0481 by jeznewsome, on Flickr• Change over the RHS Switchgear. There are a number of screws and various plastic covers/guides to remove for this and also to remove the throttle tube/grip.
• Remove the grips. RHS will only come out once throttle cable and guide have been removed and turned to the right place for the keyway. LHS is held on by two cross head screws
• Fit the heated grips to both sides. As the ones I bought had already been cut and soldered I did this the easy way by cutting again and threading the non grip cut end into the hold on the end of each clip on before twisting the bare wire ends together and pulling back through.
DSC_0476 by jeznewsome, on Flickr• Connect up the Switchgear to the original Blue and Black plug AND the new 3 way black plug on the Aux Loom.
DSC_0482 by jeznewsome, on Flickr• Route and clip all wires/looms – following how the bike was before you started and how the looms fall, this is relatively straight forward but time consuming to make neat. Note I only used the orange cable ties in areas that wouldn't be seen with the bodywork on!
• The heated grip connector (white 4 way) I routed to under the tank area. The cut ends from the grips were then re-soldered and heat shrunk such that the join was against a frame rail, for support and appropriately cable tied up.
DSC_0483 by jeznewsome, on Flickr• Before putting the tank back on, function of the grips and other switched stuff to make sure it all works appropriately.
Reassemble all you took off and enjoy warm hands.
All in all it took longer than I had thought it would but I was learning as I went along and it would be MUCH quicker if I had to do it again!
I must thank Motorworks who's service and advice has been excellent in making good my original ordering error (wrong switchgear ordered) and sending out the final missing connector to finish the job FOC (and 1st Class) so I could get the job finished today
-
dave the german
- Member
- Posts: 3644
- Joined: Tue Nov 01, 2005 4:35 am
- Location: North East
-
metropolis2k
- Posts: 380
- Joined: Sun May 26, 2013 4:47 pm
- Location: London