Page 1 of 1
Refurbishing lower front yoke
Posted: Sun Mar 15, 2015 12:13 am
by Taz
Has anyone refurbished the lower front fork yoke - mine has some paint bubbling. I wonder how easy/difficult it is to remove or is it best to refurbish insitu?
Thanks
Peter
Posted: Sun Mar 15, 2015 11:35 am
by tanneman
Yes, very easy.
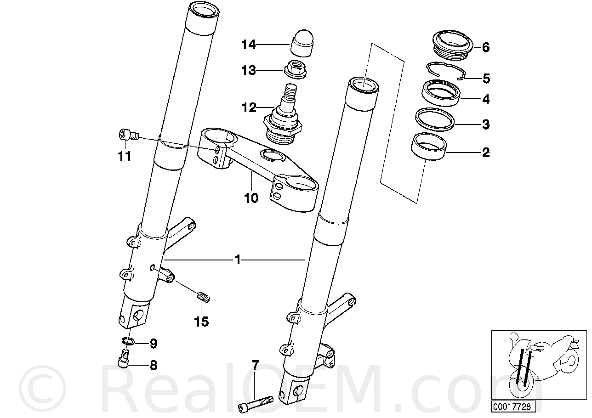
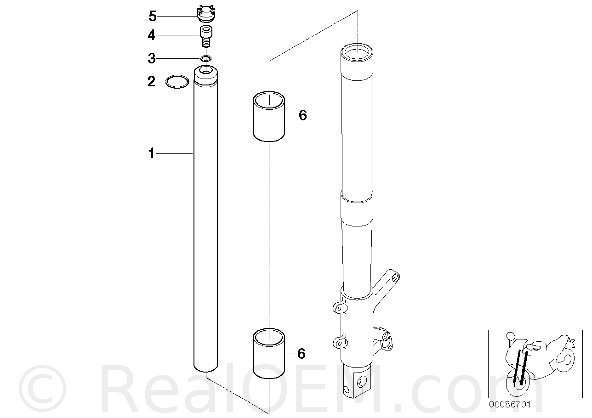
Support the bike so the front is off the ground. Wheel and brake callipers off. Give a bit of slack on the fork leg clamps on the top yoke. Remove the spring clips that holds the fork legs in the top yoke. Slack off the handle bar clamps and rest somewhere with something to prevent damage to the bodywork. Remove the handle bars by pushing the slider down through he top yoke until enough clearance to get the handlebar out.
Remove the clamps and brackets that holds the brake lines to the fork brace. Since these are only removed when a bike is scrapped or broken it would be wise to soak it in a penetrating fluid. The screw heads is delicate. Remove the Steering damper. Once again an item that was last touched on the production line. Get a allen key to hold the bolt whilst you use a spanner to loosen the nut that holds the fork brace to the telelever. Once that is undone pull the whole assembly out. Loosen the bolts on the fork brace and wedge something in there to give enough clearance to slide the fork leg out. The metal is soft so anything that you wedge in that gap should not mark the fork brace. Do remember to take the dust cap seal off to enable hassle free removal of the fork leg.
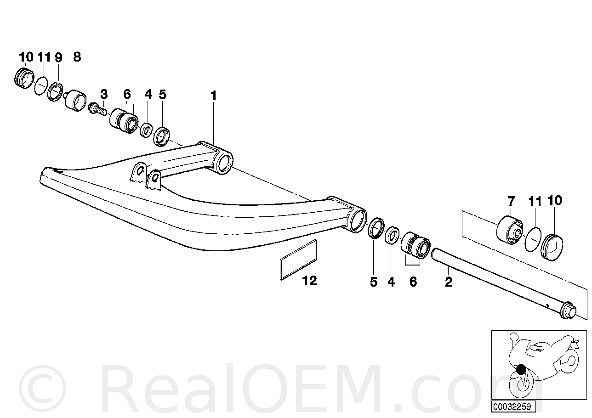
Very straight forward but it would be worth it to also do the motoyoyo mod to the telelever whilst the bike is in bits. For that the telelever has to come out. A dead easy process and best explained by someone who has done it more than once, unlike me. Be careful when you take the axle out for the telelever not to catch it on the cooling fins of the cylinder head. There is not a lot of clearance.
Basically you remove the caps at both ends. Remove a circlip at both ends. Remove a bolt at one end and pull the axle out the other end. Refer to the manual of course.
Last but not least, I'm not responsible for the bike falling on top of you.
Forks
Posted: Sun Mar 15, 2015 1:00 pm
by Taz
Thank you for the detailed explanation. It sounds that given plenty of time in which to do it methodically then it is fairly straight forward.
I'll let you know how it goes and whether I've converted the bike to a pile of scrap !!

Posted: Sun Mar 15, 2015 7:32 pm
by Boxered
Hi Peter, I happen to have a spare bottom yolk from an 1100S, I bought it years ago with the intention of refurbing it prior to swapping it out with my own bubbly one but never got around to it. It is in dire need of repainting but it is yours if you want it, just cover the postage or collect if your passing.
I have offered this up to forum members once before but got no takers, my idea was to donate this item to the forum so that one could refurb it and then swap it out with their own unit in one day to save any downtime, then that item be passed on to the next member to do the same. A kind of floating part available to whoever needed it next.
Steve
Yoke
Posted: Sun Mar 15, 2015 8:55 pm
by Taz
Steve,
Thank you for the kind offer which I shall take you up on. I will send you a PM.
Posted: Mon Mar 16, 2015 11:56 am
by Dog Tyred
Bit of advice here
viewtopic.php?t=15065&highlight=paint+forks
and here
viewtopic.php?t=14712&postdays=0&postor ... t&start=30
As you can see in the second post I changed the lower clamp bolts at the same time as the originals detracted from the new paint

If I can do it, it must be easy.
DT
Forks & Yoke
Posted: Thu Mar 19, 2015 11:22 am
by Taz
Thanks for all the advice - I am now suitably enthused to try this myself. Photographs of results (or broken fingers) to follow ....