Page 2 of 2
Posted: Sat Mar 28, 2015 6:02 pm
by Motocod
Job done, surprisingly ok in the end, only took about an hour. Induct was slightly fiddly, but otherwise not too bad. Satisfied at a job done!
Nik
Posted: Sat Mar 28, 2015 7:56 pm
by tanneman
Well done that man.
Posted: Sat Apr 04, 2015 10:56 am
by HerrFlick
Dog Tyred wrote:
Don't forget to polish the alloy tank to a mirror finish before you put the bodywork back on

Any recent pics of your sump plug?

Getting at the air filter is a pest of a job, but as others have said once U have done it a few times it gets easier.
I found my filter had lots of small pieces of plant and leaf rubbish between the pleats, which do a good job of restricting flow.
I have the same carbon intake snorkel. I've been thinking of using a length of stocking down the wide mouth of the snorkel to catch those larger pieces before they get to the air filter. Then occasionally pull it out and shake off the rubbish. Viola!
Posted: Sat Apr 04, 2015 10:59 am
by HerrFlick
Dog Tyred wrote:
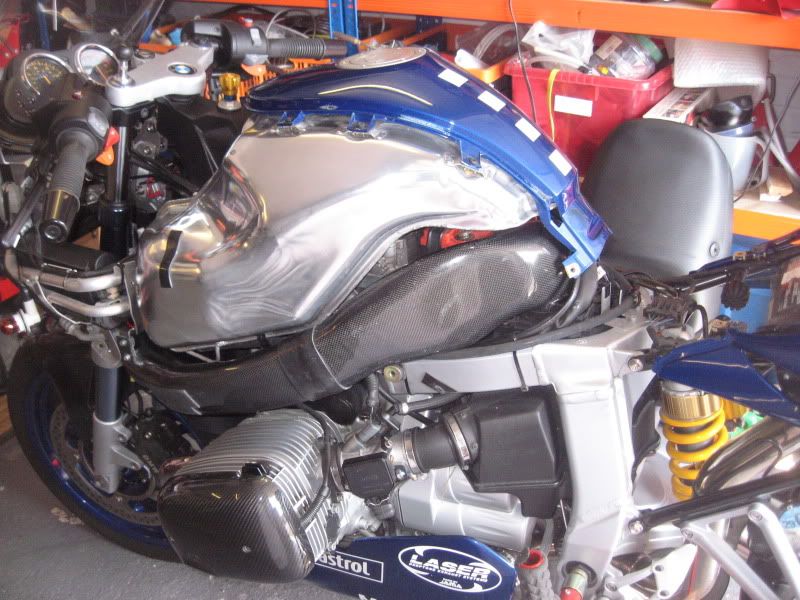
DogTyred, what's that poking out of the centre of the swingarm pivot? Footrest maybe?
Lovely looking bike by the way.
Cheers.
Posted: Sat Apr 04, 2015 12:44 pm
by dave the german
looks to be the end of an Abba stand
Posted: Sat Apr 04, 2015 4:03 pm
by Dog Tyred
HerrFlick wrote:
DogTyred, what's that poking out of the centre of the swingarm pivot? Footrest maybe?
Lovely looking bike by the way.
Cheers.
Tis indeed an ABBA stand you can see.
And thanks

DT
Posted: Sun Apr 05, 2015 12:15 am
by Mitch1100
Dog Tyred wrote:I did the fuel filter but it is a bit of a phaff. A cup of tea is your best tool when trying to reinsert the pump into the tank. Talk about a Chinese puzzle

The only think that gets you through is knowing that were able to take it out in the first place.
I was also going to fit quick release connectors to the fuel lines but gave up as I couldn't find enough room to site them. In reality the tank needs to come off so infrequently that it is just as easy to stay with the original design.
Don't forget to polish the alloy tank to a mirror finish before you put the bodywork back on
I'm assuming thats a Lennies Induct there, with the sprocket kit as well?..big difference?
Posted: Sun Apr 05, 2015 9:27 am
by metropolis2k
What I've never worked out is the order you're supposed to do the induct and the tank in. I replaced my alarm yesterday and put in a freshly charged battery, but putting it back together (which I've done too many times!) I realised just how stupid it is.
With the tank off it's simple to screw the air intake in, but you end up covering one of the tank mounting screws and the intake won't bend out of the way. If you put the tank on first it's really difficult to get to the screws holding the induct in place so you end up chewing them up
Posted: Sun Apr 05, 2015 11:51 am
by kfrogzx7
I'm with you on that Metro, there's obviously no "right" way to do it, just bad design, the last thing you'd expect of BM.
Now you've got me started what about the extremely fragile ( both mine have broken and been re super glued ) and inaccessible side panel mounting bolts behind the Beemer roundels !!
How many of those are broken on our bikes I wonder ?
Surely under there it's crying out for a decent strong push fit rubber lug !!
Anyway, I just use cable ties under there now.
Posted: Sun Apr 05, 2015 12:33 pm
by HerrFlick
metropolis2k wrote:What I've never worked out is the order you're supposed to do the induct and the tank in. I replaced my alarm yesterday and put in a freshly charged battery, but putting it back together (which I've done too many times!) I realised just how stupid it is.
With the tank off it's simple to screw the air intake in, but you end up covering one of the tank mounting screws and the intake won't bend out of the way. If you put the tank on first it's really difficult to get to the screws holding the induct in place so you end up chewing them up
Have just been caught down this road too, Metropolis2k.
Don't re-fit the Induct with the tank off. The Induct can be fitted with the tank in place, but unless U remove the tank centre strip its a bit of a fiddle to to get the Induct over the air filter housing.
Sometimes ya just have to face up to taking off what ya just put on to make job easier. LOL
I've decided to get one of them thar battery screwdrivers before my wrist seizes up.
.
Posted: Sun Apr 05, 2015 12:46 pm
by HerrFlick
kfrogzx7 wrote:I'm with you on that Metro, there's obviously no "right" way to do it, just bad design, the last thing you'd expect of BM.
Now you've got me started what about the extremely fragile ( both mine have broken and been re super glued ) and inaccessible side panel mounting bolts behind the Beemer roundels !!
How many of those are broken on our bikes I wonder ?
Surely under there it's crying out for a decent strong push fit rubber lug !!
Anyway, I just use cable ties under there now.
"just bad design, the last thing you'd expect of BM."
LOL. Didn't you know that BM (and Porsche (I have a 928)) sent their design team to Coventry to learn the most complex way to make a part, then how to locate every bolt and non-captive nut in the most inaccessible corner needing the most expensive factory tools to get at?
As for those roundels, the adhesive holding their plastic tabs to the fairing had come loose on my machine, and when I looked closely I decided to leave it that way. No vibration or other problems so far.
I like your gentle press-fit lug/grommet idea. Must look into it.
.
Posted: Sun Apr 05, 2015 1:08 pm
by HerrFlick
Mitch1100 wrote:Dog Tyred wrote:
I'm assuming thats a Lennies Induct there, with the sprocket kit as well?..big difference?
Mitch, here's the cross section of the stock rubber snorkel where it goes around the corner of the battery. Bit ordinary eh?
I felt the Induct made some difference above 5k rpm or so. But what I do think it did was to let the engine breathe better after I fitted the long GS intake tubes.
I have yet to fit Lennie's rocket sprockets (next couple of weeks maybe). Looking forward to the combined effects.


Posted: Sun Apr 05, 2015 2:27 pm
by Motocod
My induct is only held in with hex screws with self-tapping threads, so they're easy enough to remove with the tank in-situ.
Posted: Sun Apr 05, 2015 4:05 pm
by metropolis2k
Motocod wrote:My induct is only held in with hex screws with self-tapping threads, so they're easy enough to remove with the tank in-situ.
Mine are phillips heads but still self tapping. Just a pain to get a screwdriver to properly!
Posted: Sun Apr 05, 2015 6:46 pm
by Motocod
A miniature ratchet is handy, although to be fair access is a little limited. As it is, they pretty much only need to be finger tight.
