Page 1 of 2
How do I "fix" this?
Posted: Fri Aug 28, 2015 2:05 am
by BMblB
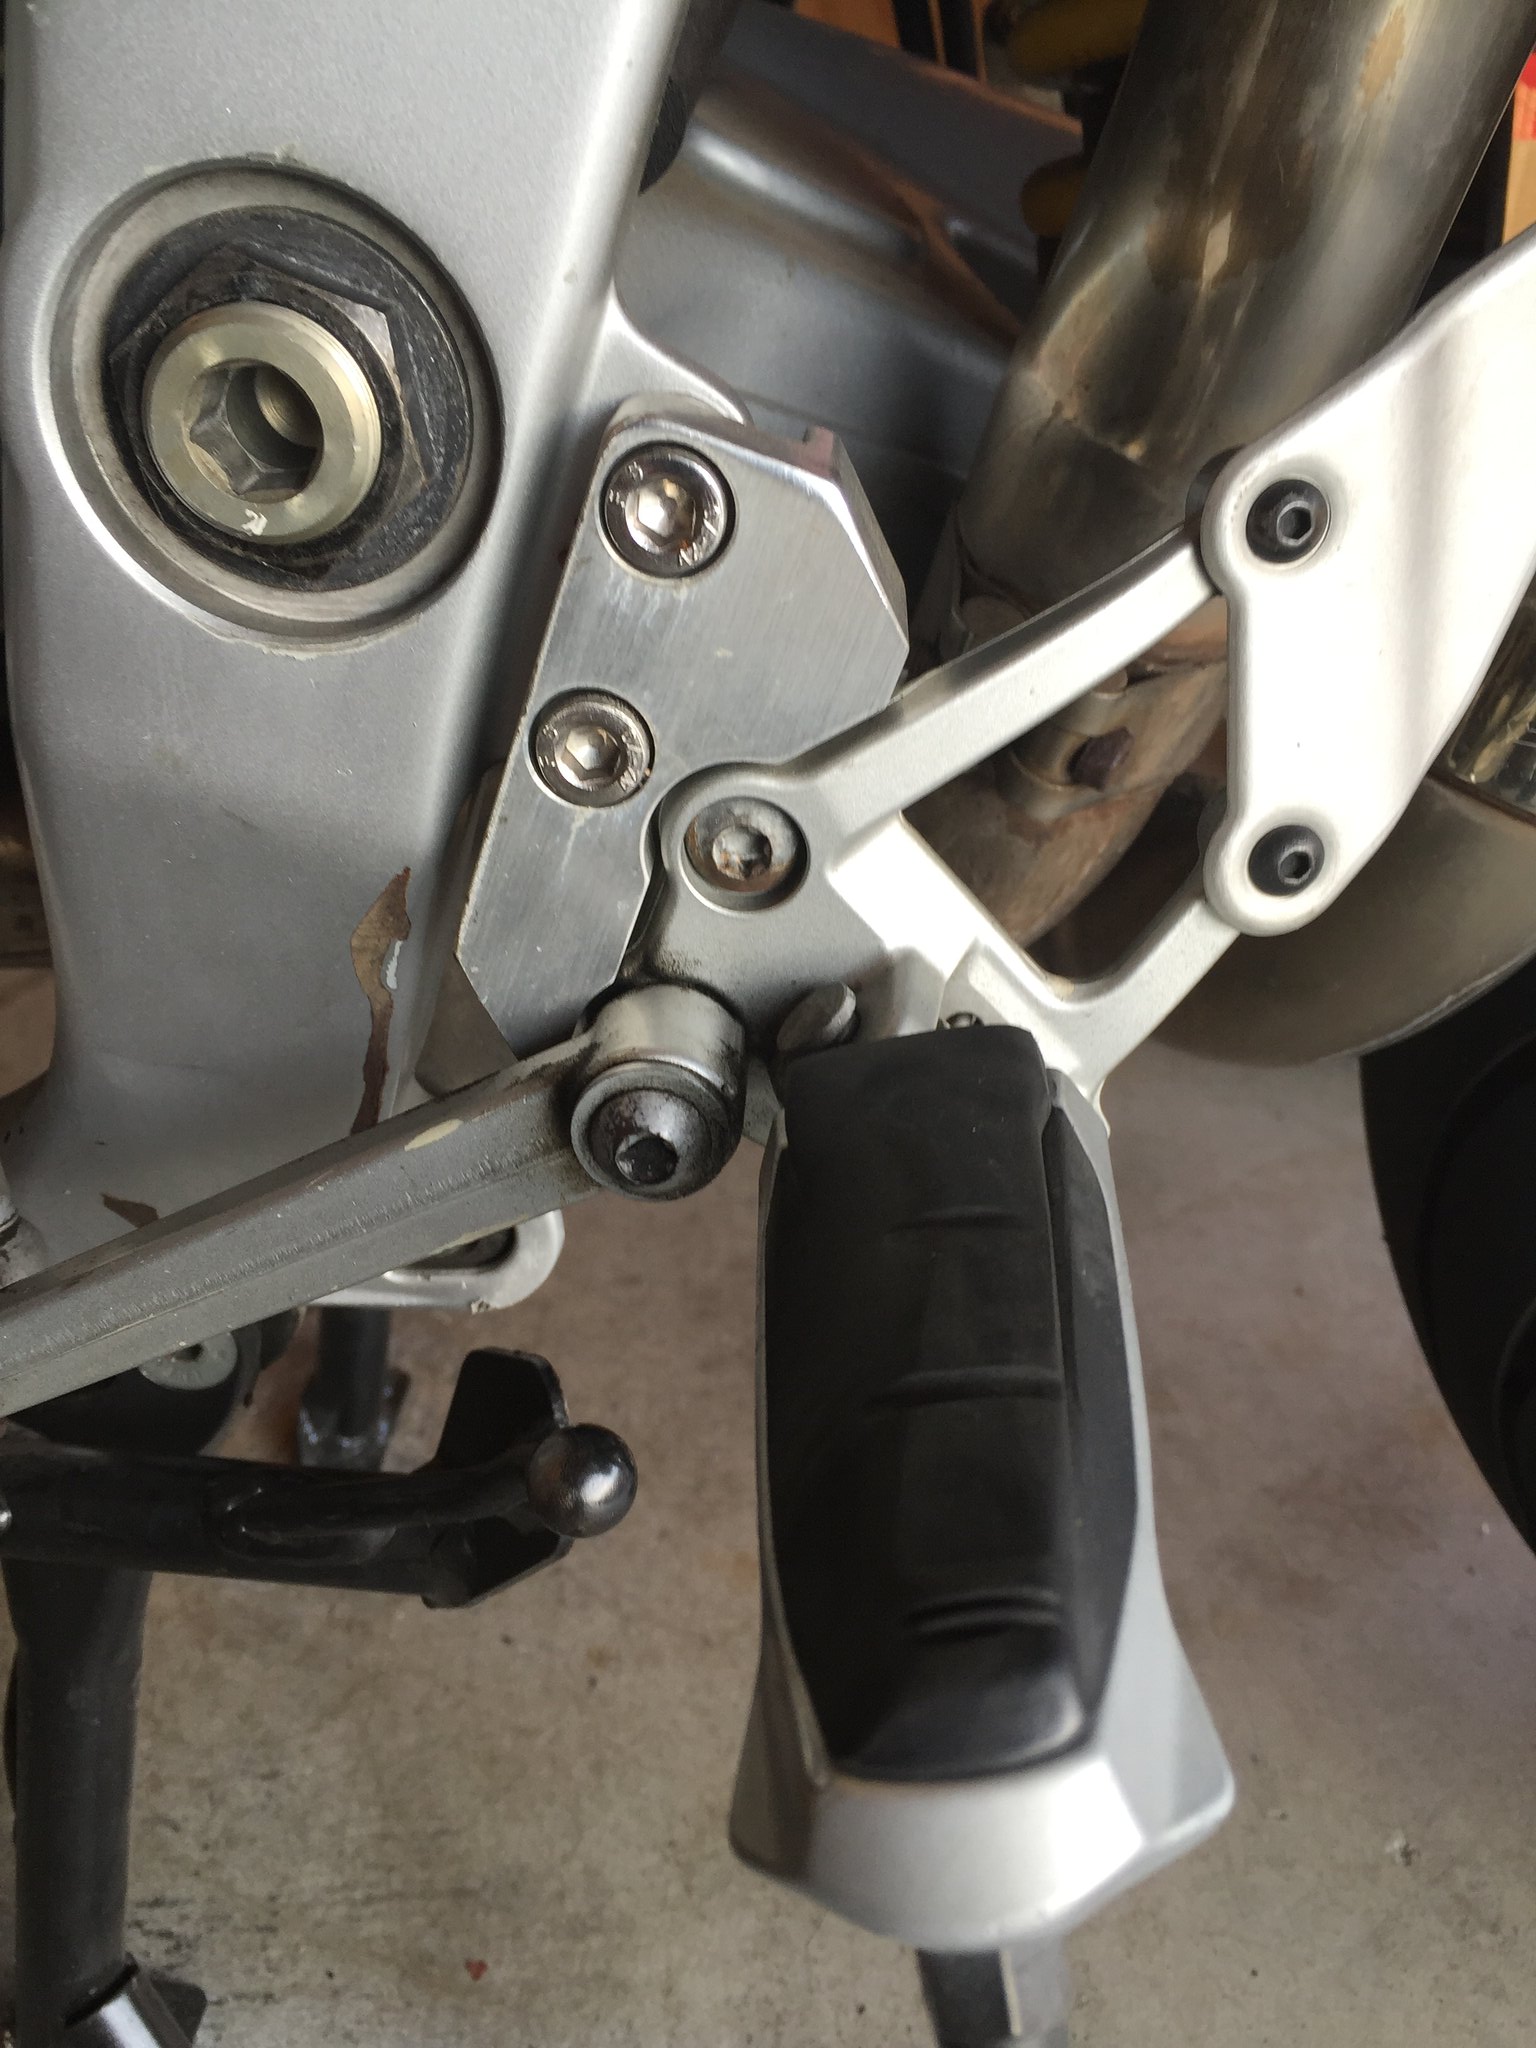
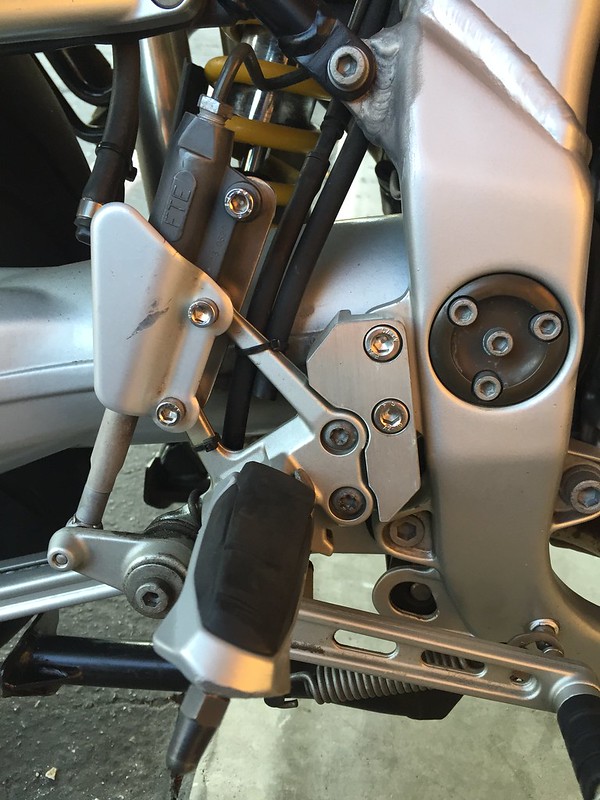
It looks like the previous owner installed some sort of footpeg lowering brackets:
 Untitled
 by
Brian Freitag, on Flickr
 Untitled
 by
Brian Freitag, on Flickr
I'm not very tall so I don't need the legroom and I grind the pegs on an almost daily basis.
How do I remove the brackets and put it back to "normal"?
Ideas?
Posted: Fri Aug 28, 2015 5:40 am
by jeznewsome
Do you not just need to remove the adapter brackets and re-attach the original footpeg assembly to the frame?
 Untitled
 by
Brian Freitag, on Flickr
p.s use the share arrow from Flickr and select BBCode option, medium size, then cut and paste the code to post photos. Use preview on the forum to check if you got it right.
Posted: Fri Aug 28, 2015 5:54 am
by Blackal
Remove the two black Torx bolts
Remove the two stainless Allen bolts
Use whichever bolts suit - to bolt the peg to the frame.
Al
Posted: Fri Aug 28, 2015 6:18 am
by McBoxer
^Wot he said!
I was about to volunteer to take the brackets off your hands, until I realised that you're in California.
Unless it's
California, Birmingham? If it is I'll pop round this weekend....
Posted: Fri Aug 28, 2015 8:24 am
by Dog Tyred
Wot they said but you will also need to disconnect the brake cylinder from the foot peg assembly as the position of the cylinder is fixed due to the hard piping. It looks like there is an extension plate behind the cylinder to allow the foot peg to be position lower so this will need to be removed as well.
Hard to tell from the photo but there must be some form of extender to the cylinder activation rod (?) as simply moving the whole foot peg assembly up while maintaining the original cylinder position will reduce the length of the operating rod considerably?
This is what it is supposed to look like although the rear end of your brake lever looks a bit different to mine.
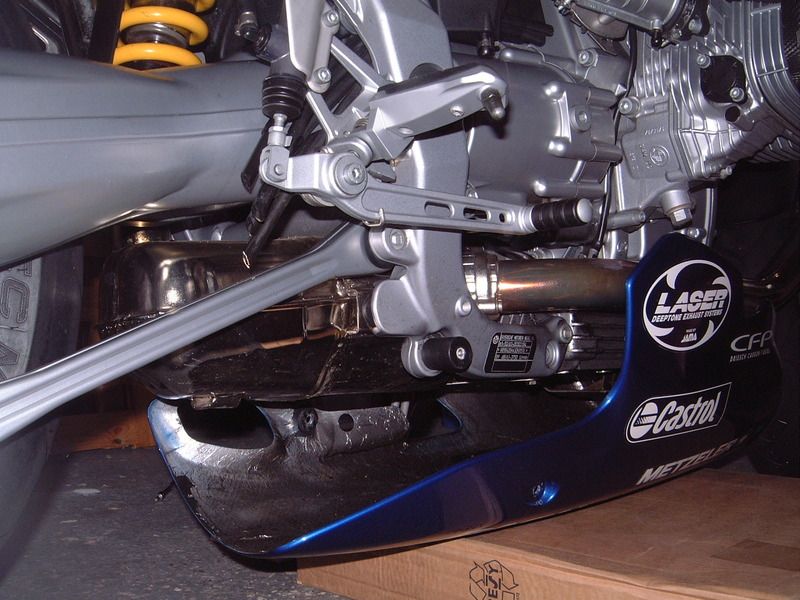
As an aside it looks like the rear sub-frame mounting lug has been welded back on at some point in the past

DT
Posted: Fri Aug 28, 2015 11:20 am
by McBoxer
Dog Tyred wrote:Wot they said but you will also need to disconnect the brake cylinder from the foot peg assembly as the position of the cylinder is fixed due to the hard piping. It looks like there is an extension plate behind the cylinder to allow the foot peg to be position lower so this will need to be removed as well.
Hard to tell from the photo but there must be some form of extender to the cylinder activation rod (?) as simply moving the whole foot peg assembly up while maintaining the original cylinder position will reduce the length of the operating rod considerably?
This is what it is supposed to look like although the rear end of your brake lever looks a bit different to mine.
As an aside it looks like the rear sub-frame mounting lug has been welded back on at some point in the past
DT
Yes, you're right. Looks like some kind of extension rod fitted between the master cylinder and the brake lever. It looks (hopefully) like the master cylinder is still in it's original position, so if you take all three stainless Allen bolts out, along with the two Torx, you should be able to simply transpose it from the lower holes to the upper holes - once the extension rod is disconnected / removed of course.
Once it's in the "upper" position I'm hopeful that you will be able to reconnect the lever to the master cylinder fairly easily - although I wonder if the original clevis type end has been swapped to allow the extension to be fitted? The end of lever does also look different to DT's, as mentioned, so you're going to have to see what's there and make a decision based on that.
A picture from a similar angle as DT's would help, if that's possible?
Posted: Fri Aug 28, 2015 5:19 pm
by Blackal
Dog Tyred wrote:As an aside it looks like the rear sub-frame mounting lug has been welded back on at some point in the past
DT
Well spotted! At least that joint is in compression, but I would want to check on the condition of the two upper lugs which are in tension in operation - and must cope with fairly high dynamic loads.
Al
Posted: Fri Aug 28, 2015 5:22 pm
by BMblB
jeznewsome wrote:Do you not just need to remove the adapter brackets and re-attach the original footpeg assembly to the frame?
I was hoping someone had installed such bracket and might have first hand knowledge on how the mod is done and therefore reversed.
The issue I foresee is that the hard brake lines are going to interfere with the rear subframe if the master cylinder needs to be moved? It may not not according to Dog Tyred.
Thanks for the image posting advice. I posted via my iPhone and the Flikr app. Obviously I messed something up.
Yes, the rear of the brake lever is very different to what Dog Tyred has pictured. Maybe it is a year to year variation?
Both the shifter and brake have the extension rods, hopefully they are easily removed and the stock parts are there to work together.
As an aside, I lost the rear brake as I was pulling in to the office this morning. As I was looking at what might be the issue, I found that the extension rod had rotated enough that it kept the brake from working. I really need to remove these unwanted bits.
And, yes, that subframe bracket has been welded back on. The bike went down on that side with the previous owner. Lots of scrapes on the hard parts.
Yes, that is the correct brake pedal
Posted: Fri Aug 28, 2015 11:33 pm
by BMblB
A call to my local BMW dealer confirms via the VIN that the ball and socket brake linkage is the correct part for my bike.
Hopefully the drop kit parts are just add ons and didn't remove the original parts. The rod is not a separate part. I'd have to buy a new rear cylinder for $200 USD. Ouch.
Posted: Sat Aug 29, 2015 4:57 pm
by Droptarotter
It's possible that the rod might have enough adjustment to go back to stock.
I can't really see this kit containing another rod.
If it's still too long, you might be able to grind it to a shorter length??
Cheers
Posted: Sat Aug 29, 2015 6:41 pm
by f90x
Dog Tyred wrote:Wot they said but you will also need to disconnect the brake cylinder from the foot peg assembly as the position of the cylinder is fixed due to the hard piping. It looks like there is an extension plate behind the cylinder to allow the foot peg to be position lower so this will need to be removed as well.
Hard to tell from the photo but there must be some form of extender to the cylinder activation rod (?) as simply moving the whole foot peg assembly up while maintaining the original cylinder position will reduce the length of the operating rod considerably?
This is what it is supposed to look like although the rear end of your brake lever looks a bit different to mine.
As an aside it looks like the rear sub-frame mounting lug has been welded back on at some point in the past
DT
Greg, I can se a tint dot of dirt on the exhaust but I'm not telling you where.
Posted: Sat Aug 29, 2015 8:43 pm
by Dog Tyred
f90x wrote:Greg, I can se a tint dot of dirt on the exhaust but I'm not telling you where.
ha! Steve alas that photo was taken about 7 years ago when I first got the bike. It is not 'quite' that clean any more.
DT
Posted: Sat Aug 29, 2015 10:30 pm
by Al
I have a similar wunderlich kit fitted to my bike but the extension for the brake cylinder fits between the rigid brake pipe and the top of the cylinder not the between the cylinder botton and the rear of the brake lever, I looked at several kits before getting mine and didn`t see any like yours, could it be a one off. you might be able to get another cylinder cheaper off ebay.
Al.
Posted: Thu Sep 03, 2015 12:07 am
by boxerscott
remove the hero blobs, Yorkshire fix. gives you another 30mm of clearance.

1/4 turn of spanner is easily enough to shear them off. (DAMHIK)
Posted: Thu Sep 03, 2015 8:02 am
by DPG
f90x wrote:Dog Tyred wrote:Wot they said but you will also need to disconnect the brake cylinder from the foot peg assembly as the position of the cylinder is fixed due to the hard piping. It looks like there is an extension plate behind the cylinder to allow the foot peg to be position lower so this will need to be removed as well.
Hard to tell from the photo but there must be some form of extender to the cylinder activation rod (?) as simply moving the whole foot peg assembly up while maintaining the original cylinder position will reduce the length of the operating rod considerably?
This is what it is supposed to look like although the rear end of your brake lever looks a bit different to mine.
As an aside it looks like the rear sub-frame mounting lug has been welded back on at some point in the past
DT
Greg, I can se a tint dot of dirt on the exhaust but I'm not telling you where.
Its worse than that - the belly pans 'anging orf!
